(V1 of the documentation) |
|||
| Line 5: | Line 5: | ||
The portal is where you are able to manage the games and their associated data. | The portal is where you are able to manage the games and their associated data. | ||
'''Step 1:''' To register please follow this [https://portal.guraas.com/user/register/ link]. <blockquote>'''Note:''' Since GURaaS is a new service we are looking into setting up an appropriate certified mail server, as such, the confirmation email might be ending up in your spam folder | '''Step 1:''' To register please follow this [https://portal.guraas.com/user/register/ link]. <blockquote>'''Note:''' Since GURaaS is a new service we are looking into setting up an appropriate certified mail server, as such, the confirmation email might be ending up in your spam folder</blockquote> | ||
[[File:Portal.newGame.png|thumb|452x452px]] | [[File:Portal.newGame.png|thumb|452x452px]] | ||
'''Step 2:''' If you already registered please [https://portal.guraas.com/user/login/ login.] | '''Step 2:''' If you already registered please [https://portal.guraas.com/user/login/ login.] | ||
'''Step 3 | '''Step 3:''' Create a new Game entry. On the left side, under Games > Add new game. | ||
There are a few mandatory fields which are indicated. | There are a few mandatory fields which are indicated. | ||
| Line 20: | Line 18: | ||
'''Step | '''Step 4:''' After complete the adding a new game, your game will be listed in the Avaliable Games list. By selecting it, you can have access to more details about the game including, the unique <u>generated game code</u>, which represents your game. | ||
[[File:Portal.game.png|thumb|930x930px]] | [[File:Portal.game.png|thumb|930x930px]]<br /> | ||
'''Step 5:''' Submit your data. GURaaS uses a publicly available API to push your data. | |||
If you are using a game engine like Unity or Unreal, please consider using our plugins, please check our Tutorials: | |||
[[Unity plugin documentation|Integrating GURaaS with Unity]] | |||
It is also possible to us GURaaS with your code, but just following our [[Games Recording Gateway API]], | |||
'''Step 7:''' Access your data. | |||
''' | Your data can be access directly in the Available Games list, and clicking the icon. [[File:Portal.data icon.png|frameless]] <blockquote>'''Note:''' Since GURaaS is a new service we are limiting number of values to 500 data points to be displayed, no limitation is imposed when using the Log API.</blockquote>The data can also be accessed by the [[Log API]], which is resumed here: | ||
* Obtains session information of a specific game: [https://logs.service.guraas.com/help/v1/{game_id}/sessions https://logs.service.guraas.com/v1/{game_id}/sessions] | |||
* Obtains all logs of a specific game: [https://logs.service.guraas.com/help/v1/{game_id}/logs https://logs.service.guraas.com/v1/{game_id}/logs]", | |||
* Obtains all sessions and logs of a specific game: [https://logs.service.guraas.com/help/v1/{game_id}/sessionlogs https://logs.service.guraas.com/v1/{game_id}/sessionlogs] | |||
< | <blockquote>'''Note:''' For more information on how to filter information using the WebAPI please consult the [[Log API]]</blockquote> | ||
Revision as of 13:05, 22 April 2020
Welcome to GURaaS.
To get started with data collection with your game, you have to register and login into our portal.
The portal is where you are able to manage the games and their associated data.
Step 1: To register please follow this link.
Note: Since GURaaS is a new service we are looking into setting up an appropriate certified mail server, as such, the confirmation email might be ending up in your spam folder
Step 2: If you already registered please login.
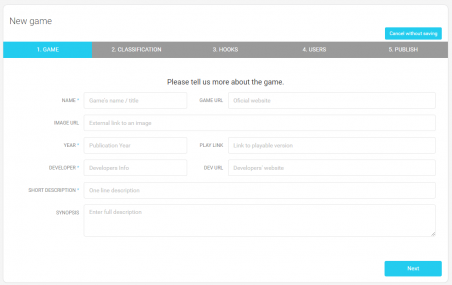
Step 3: Create a new Game entry. On the left side, under Games > Add new game.
There are a few mandatory fields which are indicated.
You can ignore the Hooks section, for now. To know more about in-game Hooks, please read this section.
The user section allows you to provide permissions to other users, to see and have access to the in-game data.
Step 4: After complete the adding a new game, your game will be listed in the Avaliable Games list. By selecting it, you can have access to more details about the game including, the unique generated game code, which represents your game.
Step 5: Submit your data. GURaaS uses a publicly available API to push your data.
If you are using a game engine like Unity or Unreal, please consider using our plugins, please check our Tutorials:
It is also possible to us GURaaS with your code, but just following our Games Recording Gateway API,
Step 7: Access your data.
Your data can be access directly in the Available Games list, and clicking the icon. ![]()
Note: Since GURaaS is a new service we are limiting number of values to 500 data points to be displayed, no limitation is imposed when using the Log API.
The data can also be accessed by the Log API, which is resumed here:
- Obtains session information of a specific game: https://logs.service.guraas.com/v1/{game_id}/sessions
- Obtains all logs of a specific game: https://logs.service.guraas.com/v1/{game_id}/logs",
- Obtains all sessions and logs of a specific game: https://logs.service.guraas.com/v1/{game_id}/sessionlogs
Note: For more information on how to filter information using the WebAPI please consult the Log API

