This page describes how to set up and use the GURaaS logging plugin for unity.
installing the plugin
- Download the plugin unity asset TODO: download link.
- Import the plugin into unity (Assets -> Import Package -> Custom Package...).
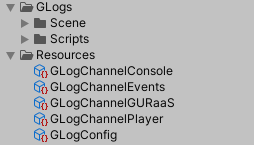
- Your project should now have the following additional assets:

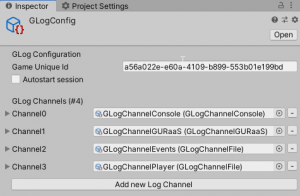
- Select the GLogConfig asset and set the Game Unique Id to the Id assigned to the game on the GURaaS portal.


- The plugin is now set up and ready to use!
Your first log
using GLogUnity;

GLog.StartSession();
GLog.Log(VerboseLevel.DEBUG, "tag1", "tag2", "data");
GLog.Debug("Test");
GLog.Info("Test");
GLog.CloseSession();
Plugin structure
The plugin consists of three important components:
GLog
When using the plugin your asset folder should have a single GLog asset (called GLogConfig) in a Resources folder. When unpacking the plugin a GLog asset is placed in the Resources folder. The config is a ScriptableObject that contains the settings for your game and functions as a central point for any interaction with the plugin.
GLogChannel
A channel is a ScriptableObject that listens to the logs passed to GLog and passes any logs that match its verbosity mask to an output. The plugin comes with 3 different types of channels, but more can be added by extending the GLogChannel class. The default channels are:
- File channel: outputs received logs to the file location specified.
- Console channel: outputs received logsto the Unity console.
- GURaaS channel (or remote channel): sends received logs to the GURaaS server.
A game can have multiple channels, but only channels that are referenced in the GLogConfig will be used.
The plugin includes one existing channel asset for each of the default types, these can be found in the Resources folder.